How to Use Mirrors to Maximise Space

When it comes to interior decoration, mirrors are secret stars. A carefully placed made-to-measure mirror can turn a dark, dingy space into a large, light one and visually triple it in size.

Their reflective surface creates a fantastic illusion that increases the size of any room. It will bounce around any light already in it (natural and artificial) and make it feel a lot lighter, brighter and much airier.

Even better, the way it reflects and repeats the space in front of it also adds depth, stretching out floors and easing apart walls to create a bigger, fresher room.

That’s why we thought we should show you some crafty tips on how to decorate with mirrors and turn your teeny compact rooms into big bright spaces. In this post we’ll share suggestions on how to use mirrors to make a room look bigger, how to raise your ceilings and lengthen your hallways, all through harnessing the magic of mirrors.

How do you enlarge a room with a mirror?

When trying to maximise space with a mirror, where to hang it is the important question.

One simple technique is to hoist your mirror high.  If you’re worried about low ceilings cramping your space, angle mirrors at a slant between the wall and ceiling. This will elongate the gap between the floor and the ceiling, making your walls seem taller and your ceiling feel higher.

Another idea is to put one near or next to a window. This will help it catch the perfect amount of light, as well as reflect the world outside. Capturing beautiful, natural light inside will always make a room feel not just bigger, but happier too.

One word of caution though: avoid placing mirrors directly opposite a window. Direct sunlight on a reflective surface can get incredibly hot, and the temperature may actually damage your mirror, dulling the reflective surface and bleaching any decorative work.

How do you use a large mirror in a small space?

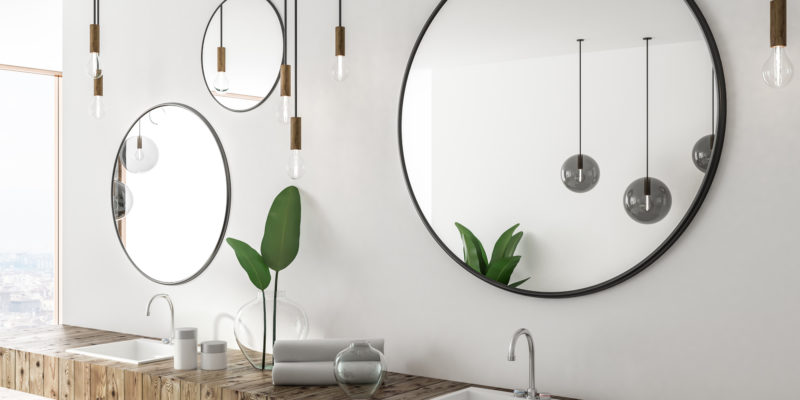
Small or awkward spaces will massively benefit from a big mirror. If you’ve got sloping ceilings, alcoves or protruding walls, then a custom-cut mirror perfectly slotted into an awkward spot will really open your room up. Not only will the mirror help capture the light, it creates an attractive feature that will complement the odd angles and turn them into features.

At KLG, we make custom mirrors cut to size, allowing you to tackle any troublesome spots. Whatever their shape or dimension, you can transform your crooked, confined spaces easily with a bespoke mirror.

Using Mirrors in a Narrow Hallway or Corridor

Adding a long, tall mirror to a hallway or corridor is a great way to make a narrow space feel wider and fresher. Don’t feel tied to just placing one at the end of the hall, as lengthening the room this way, may actually make it feel even narrower.

Instead, hang them on the longer side walls. Go for one lovely large one, or even multiple mirrors. Patchwork different sizes and shapes to create a ‘mirror gallery’ and you’ll manage to add style as well as space to your hallway.

Of course, there’s one final advantage to keeping mirrors in your hallway, or by your front door: it lets you have one last check of how you look before you leave the house!

Decorating with Mirrors

Mirrors aren’t just cunning tricksters primed for maximising your space, they also make a great decorative feature in their own right. Here are some tips for making the most of mirrors in your home:

  • Turn your mirrors into a focal point

An ornate frame, intricate with scroll work, will add a feel of regal decadence to even the smallest space. While a simple driftwood frame stained white is a surefire shortcut to a bright, breezy beach house vibe.

  • Try not to go overboard

Unfortunately, the answer to the question can you have too many mirrors in one room, is yes.

As wonderful and miraculous as they are, it is definitely possible to go too far when you’re decorating with mirrors. No more than two large mirrors, or a single wall with mirrors in one room are good rules of thumb. If you use too many, your rooms will actually start to feel busy, cluttered and really just shrink them right back down.

  • Don’t be constrained by frames

Mirrors without frames can make arresting features and focal points. Sandblasting is a great way to add patterns or textures straight onto the surface of the mirror itself,  it works particularly well in bath and wet rooms.

Alternatively, small, plain mirrors can be built up to make a mosaic wall. The clean lines of the unframed mirrors will give a minimalist edge to your decor, while the maximised light will help enlarge the space into a big, bright and modern space.

  • Choose your rooms wisely

Another common worry people have about mirrors can be; is it bad to have mirrors in your bedroom?

While it isn’t bad as such, you should definitely take care where you place mirrors in rooms designated for sleeping. Avoid placing them where they will reflect the bed – it can be a little tacky and quite off-putting to wake every morning face-to-face with your sleep-soaked self. A great alternative is to have it above the headboard, so you can choose when to admire your reflection and when to ignore it.

Think about where the morning sun will enter your room too, being awoken by sunlight reflected off a mirror isn’t always as fun as you’d hope it would be.

Mirrors are a fantastic interior design tool. A fail safe way to grow small box rooms into pleasurable spaces, and dingy hallways in bright, broad walkways. Whether it’s one with a statement frame, or a custom-cut extra-large mirror, hopefully this post has given you a couple of ideas on how you can use mirrors for maximum impact in your home.

The Science Behind UV Bonding

The process of UV bonding is a relatively new one but one that is growing in popularity. It has some fantastic advantages over other methods, including the finished appearance and the ease of the process.

In this post we’re going to look at the ins-and-outs of UV bonded glass, discussing how it works, where it is most commonly used and why so many people are choosing it as their preferred method.

What is UV Bonding?

UV bonding is a way of joining two pieces of glass together. It uses a special adhesive or glue that ‘sticks’ the glass together and eliminates the need for extra screws, bolts or fixings.  The ultraviolet element of the name comes from the curing process; once the special adhesive is in place, it is then ‘cured’ under a UV bonding light.

This adhesive process is popular because it is incredibly secure. In fact, it often leaves a join that is stronger than the glass itself. It is also attractive: the adhesive is transparent, and should appear almost invisible on the panes of glass.

UV bonding is one of the most popular ways to bond glass. A predominant reason for this is down to the durability of the bond: it is so strong, and it lasts such a long time. Of course another reason is the sleek finish it gives. It is easy to control and should always create a clean, clear join.

The final reason it is so popular is that the UV bonding process has many versatile uses, not just for joining glass to glass.

How Does UV Bonding Work?

UV light bonding glue is sometimes referred to as liquid glue. This is because it stays liquid for prolonged periods, and is stable at room temperature. In fact the only thing that can ‘activate’ it and make it dry to form a bond is exposure to a UV bonding light.

This process works because of the intensity of UV light. When a UV glass bonding light is shone on the adhesive, it creates a chemical reaction within the glue. This causes the adhesive to harden, which in turn forms the bond. This process is called ‘curing’.

The whole procedure can be completed very quickly. Applying the light for as little as 3 seconds can create a durable, robust bond that lasts. Alternatively, you can leave it for longer to make it more secure, or even apply a second layer to create an unbreakable bond. You may also need to leave it on longer depending on the wattage of the UV glass bonding lamp  you use and the thickness of the glass.

The stability of the compound and the specific conditions needed for the UV liquid glue to cure, makes this technique much simpler and more reliable than other methods such as drying. In other bonding methods, the adhesive is cured by evaporation. This process is massively unpredictable and can be easily affected by a number of variables, including temperature and humidity.

In comparison, UV bonding allows you complete control of the curing from start to finish. This is one of the reasons it gives such good results.

The speed and the control that the process allows also means that it gives very consistent results. When the best results are strong, stable and sleek joins that stay secure and look great, this consistency is a brilliant bonus. It’s a technique that promises optimum quality. You can always trust your UV bonded glass will last a long time and look lovely for the entire duration of its life.

What is UV Bonded Glass Used for?

Most types of glass can be bonded using a UV bonding liquid. The only real requirement necessary for the glass is that the surface of it is very flat, very bright and very polished. If these conditions are met, you should be able to create a formidable, unbreakable bond using UV bonding liquid glue.

And it doesn’t just work to secure glass against glass. You can also use this technique to attach wood, plastic and even metal parts such as legs, hinges or handles to glass as well.

The crystal clear, robust and strong joins make it well suited to the construction of items that are more often seen to be made from wood, fixed with durable screws.  For example the UV technique is commonly used in the creation of glass furniture from small to large scale items such as:

  • Coffee tables or desks
  • Display cabinets
  • Shelving units

It is also perfect for use in making modern, minimalist and stylish accessories such as umbrella stands, magazine racks and ornaments.

Of course, you don’t have to be constrained by the clear finish that UV bonding provides either. The adhesive makes a completely flush surface that can be sanded down and covered, decorated or even painted with ease. There is nothing stopping you from giving a bonded surface a beautiful, unique, decorated look.  

This technique excels in the construction of glass display cabinets and trophy cabinets. The transparent joins allow the maximum possible light to get in, ensuring display items are always shown to their best advantage. Even better, the clean lines only enhance the intricacies of the items contained within. When combined with an opaque base or back to the case, these cases can also provide a gentle diffusion of natural light which will further flatter their contents.

In the creation of display cabinets, you can also use this process to attach locks, hinges and runners. Again, you can trust in the security that these additions will provide when they’re attached to the cabinet by UV bonding: impossible to remove without breaking the glass, they keep any contents safe and secure, while displaying them clearly and attractively..

The final main use for UV glass bonding is in architecture. The strength of the bonds mean they are well suited for use in the construction of staircases, balconies and doors. Designed in glass, these features can enhance any interior and turn it into a modern, stylish space.

Using UV activated adhesive, is one of the most popular ways to bond glass. With it’s long life and clean look, we suspect you will now see why so many people choose it.